With the addition of the VIC-IV, the Mega65 is not limited to a fixed sized screen anymore, the application can set the screen to any size up to 720 x 576 on PAL and 720 x 480 on NTSC.
The display is made up of two components, the border around the edges (light blue) and the characters that make up the screen (dark blue).
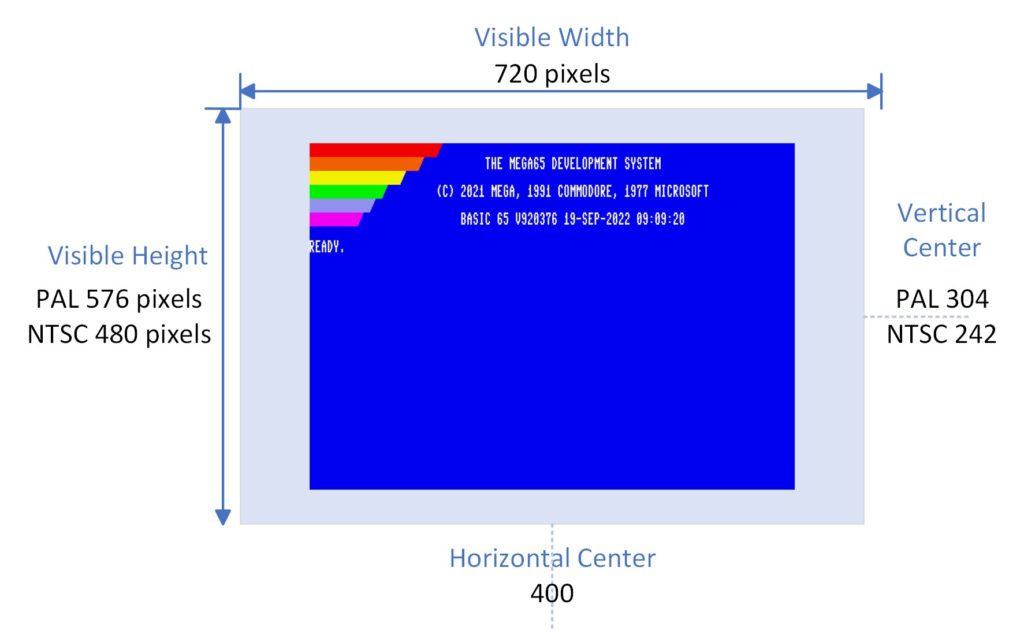
Laying out the screen really just comes down to figuring out how many visible characters you want (depends on the H&V scaling modes) and then calculating how much border is needed. Because I like to keep the screen centered I use the horizontal and vertical center values to base all of my calculations off of.
You can find the accompanying code here, https://github.com/RetroCogs/Mega65Tutorials, this tutorial is covered in tutorial_1_screens.asm.
Related Hardware Registers
Here are the main registers that affect the layout of the screen :-
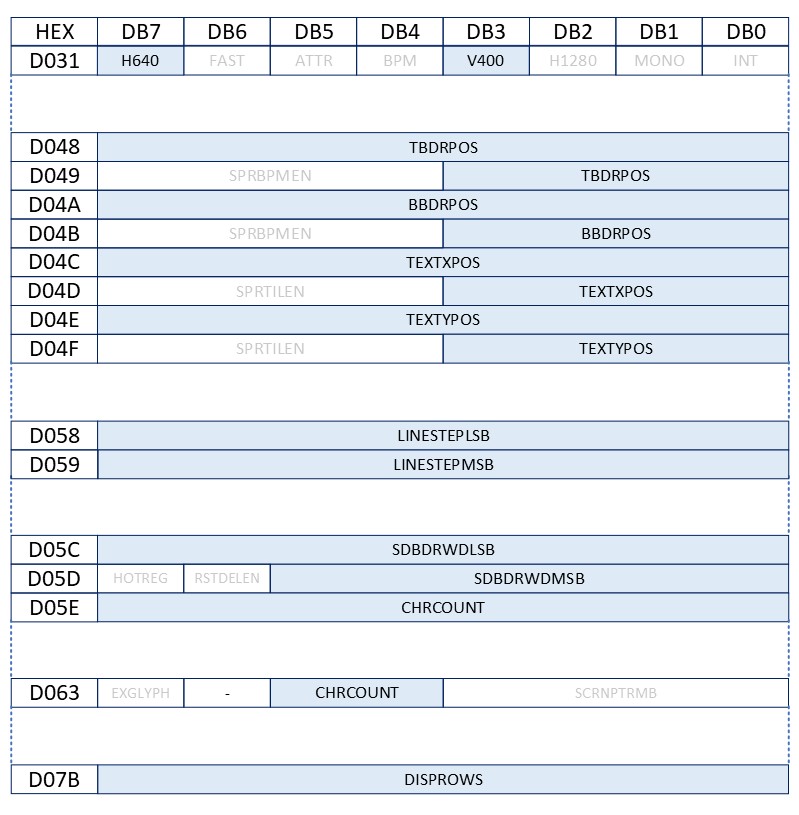
It is worth noting that while the majority of these registers are represented in ‘native’ pixels the VIC-IV adds two scaling modes for characters vertically and horizontally and depending on which scale you are using you may need to multiply some values by 2 (more details below).
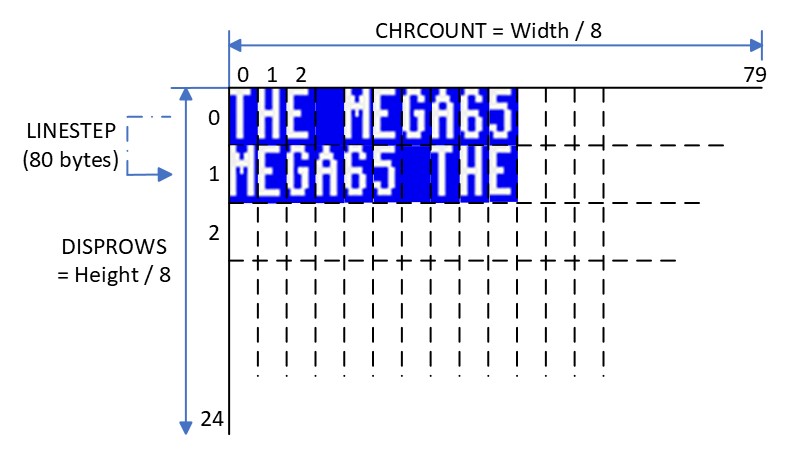
CHRCOUNT, DISPROWS and LINESTEP
The screen is made up with characters and in normal character mode each character takes up one byte, this means for an 80 column mode each line takes up 80 bytes. Once you know the size of your screen (either by deciding the number of columns and rows or by calculating it from the desired number of pixels wide and high) you will need to set the following.
CHRCOUNT = The number of characters in a row that you want the VIC-IV to draw, note that there is currently a bug in the VHDL that makes values for CHRCOUNT > 255 not valid, once that bug is fixed I will remove this comment.
DISPROWS = The number of rows the VIC-IV should draw.
The VIC-IV can also specify how many bytes to step when moving to draw the next row, this is super handy when you want to define a screen area that is larger than the set of characters you are displaying, you will see this used in the next tutorial when we scroll the screen.
LINESTEP = The number of bytes to advance when moving to the next row.
Horizontal scaling modes : H640 vs H320
When the Mega65 initially boots it is in H640 mode giving the display 80 characters wide, if you want to use the equivalent of the 40 column mode, you can disable bit 7 of $D031 to enable H320 mode.
The biggest thing to watch out for is that the layout registers (TEXTXPOS, SDBDRWDLSB) are measured in H640 values, when in H320 mode each 8 pixel wide character will be 16 pixels in the hardware registers. This means that if you want to move the screen one H320 pixel to the left you’ll need to move it two pixels in the registers.
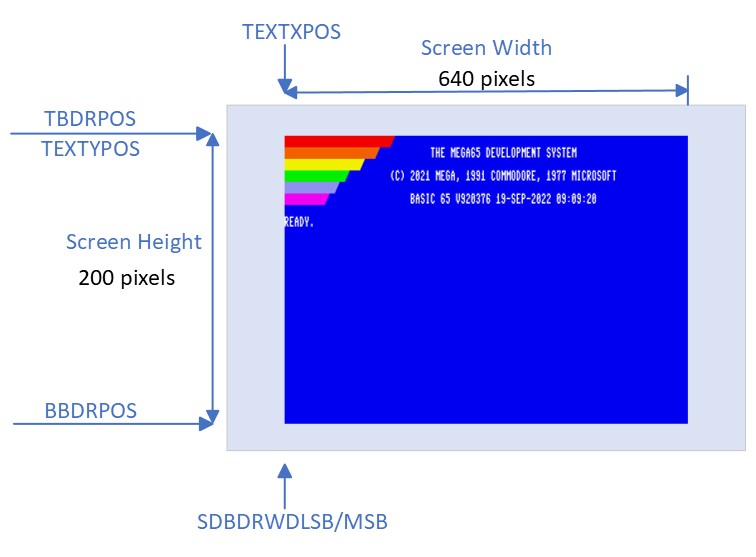
Horizontal positioning
To place the screen horizontally we need to specify :-
SDBDRWDLSB&MSBH640 = pixel location of where the left border ends, horizontally the border is symmetrical and covers the same amount of screen left and right and so the value in $D05C,D is the number of pixels (both left and right in H640 units) that need to be covered.
TEXTXPOSH640 = pixel location of where the left edge of the screen is located once again in H640 units.
First you’ll need to figure out how many visible pixels wide your screen is, to do this you can either take the number of characters wide and multiply by 8 or choose something appropriate for your selected H mode.
If you are in H320 mode, multiple by 2, this is the full width in H640 units of the visible screen.
PixelsWideH640 = (NumCharacters * 8) * (H320 ? 2 : 1)
As we’ve show above the horizontal center of the screen is at 400 and so the left edge of the screen will be located at :-
LeftEdgeH640 = 400 – (PixelsWideH640 / 2)
Now that you have LeftEdgeH640 you can set the hardware registers :-
TEXTXPOSH640 = LeftEdgeH640
SDBDRWDLSB&MSBH640 = LeftEdgeH640
Your screen will now be nicely centered.
Vertical scaling modes : V400 vs V200 modes
When the Mega65 initially boots it’s in V200 mode giving the display 25 characters high, you can optionally choose 50 row mode by enabling bit 3 of $D031 to enable V400 mode. Be warned, V400 mode can get pretty hard to read on a CRT!!
Note that all of the layout registers (TEXTYPOS, TBDRPOS, BBDRPOS) are measured in V400 values, so when in V200 mode each 8 pixel high character will be 16 pixels in the hardware registers. This means that if you want to move the screen one V200 pixel up you’ll need to move it two pixels in the registers.
Vertical positioning
To place the screen vertically we need to specify :-
TBDRPOSV400 = pixel location of where the top border ends.
BBDRPOSV400 = pixel location of where the bottom border starts.
TEXTYPOSV400 = pixel location of where the top edge of the screen is located once again in V400 units.
Figure out how many visible pixels high your screen is, to do this you can either take the number of characters high and multiply by 8 or choose a number that is appropriate for your selected V mode.
If you are in V200 mode, multiple by 2, this is the full height in V400 units of the visible screen.
PixelsHighV400 = (NumRows * 8) * (V200 ? 2 : 1)
This is where is gets a little tricky, because PAL and NTSC have different number of lines the vertical center will depend on which video standard you are using, for now we will assume PAL and from the top diagram the vertical center of the screen is at 304 and so the top edge of the screen will therefore be located at :-
TopEdgeV400 = 304 – (PixelsHighV400 / 2)
BotEdgeV400 = 304 + (PixelsHighV400 / 2)
Now that you have the TopEdgeV400 and BotEdgeV400 you can set the following registers.
TEXTYPOSV400 = TopEdgeV400
TBDRPOSV400 = TopEdgeV400
BBDRPOSV400 = BotEdgeV400
And voila have a fully centered screen with the correct amount of border around it, you will end up with something like this, depending on your chosen H&V scale modes and size of screen.
In the next tutorial we will explain how to use a technique of shifting TEXTXPOS and TEXTYPOS to freely scroll the screen around in very few instructions.
Please free to leave comments and point out any mistakes, I want to keep these blog entries as a kind of living document that is always up to date and correct so future coders can use this as a reference site.
Very nicely explained!
Great stuff! Looking forward to seeing more from you 🙂
It feels like “Zen of Mega65 Gfx programming” 🙂 Many thanks !
Great breakdown of the screen structure of the VIC-IV. I look forward to reading more!
Thank you very much, well done. You should keep up the blog!