Unless all the action on your game is going to take place on a single screen you are going to want to scroll the screen. Using the VIC-IV there are a few methods of achieving this and in this tutorial we will show how to scroll the screen in all directions using the simplest method, by setting the screen and color buffers to a size larger than the screen and then modifying TextXPos, TextYPos, the screen pointer and color pointer.
The sample code is located here https://github.com/RetroCogs/Mega65Tutorials and you will want to look at the source file tutorial_2_scrolling.asm
The video below shows what the sample will look like once compiled and run on either the Xemu emulator or when executed on real hardware (Mega65 or Nexys).
How the screen is sized and placed in memory
As a quick recap from the last tutorial we defined the following registers that specify with width, height and layout of the screen and color RAM :-
CHRCOUNT = The number of characters in a line that the VIC-IV will draw.
DISPROWS = Number of rows that the VIC-IV will draw.
LINESTEP = The number of bytes to advance when moving to the next row.
You will see in the diagram below that we’ve also introduced the following :-
SCRNPTR = The screen RAM pointer can be placed anywhere in RAM using this 32 bit pointer with byte granularity, for example, if you want to scroll the screen one character to the left you just add one byte to the screen RAM pointer.
COLPTR = Color RAM is represented as an offset from the location $FF80000, it is only a 16 bit offset so at largest your color RAM buffer can be up to 64k.

Tip: A general tip I use for all of my buffers is that I ensure that any buffer never crosses a 64k boundary, the benefit if we follow this is that once the upper 16 bits of a 32 bit address are set we never need to modify them and so moving a pointer to the next line for example is always just a 16 bit add. Here is how you set the 32 bit pointer in kick assember.

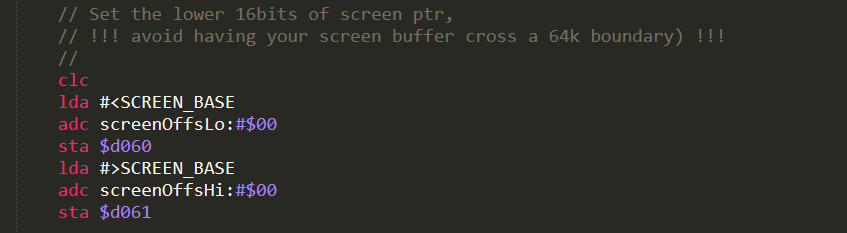
But when updating the screen pointer you really only need to update $D060 and $d061 like this …
Related Hardware Registers
Here are the main registers that affect the layout of the screen, note the new additions for the tutorial in green :-

Horizontal scrolling
In order to scroll horizontally, first, we are going to set LINESTEP to be a value greater than CHRCOUNT, as an example, two 80 column screens wide would be a LINESTEP of 160 bytes.
In the sample we are using the value XPos to hold the horizontal scroll position, every frame we are taking this value subtracting it from the LEFT_BORDERH640 to create a new value for TEXTXPOSH640.
You can see in the diagram below that as XPos increases TEXTXPOS moves more and more to the left, this continues until a whole character has been scrolled at which point TEXTXPOS resets to LEFT_BORDER position and we increment the screen and color RAM pointers.

You can also see that as we shift the screen to the left a space is appearing on the right, to remedy this we need to increment CHRCOUNT by one so in our example we will get the VIC-IV to draw 81 characters, the 80 that fit within the borders and one extra that shows up as we scroll.
We calculate the amount that we shift left from XPos, remember that if you are in H320 mode you will need to multiply by 2.
HShiftOffsetH640 = (XPos & 7) * (H320 ? 2 : 1)
Now we can get the new TEXTXPOS by subtracting the HShiftOffset from LEFT_BORDER.
TEXTXPOSH640 = LEFT_BORDERH640 – HShiftOffsetH640
Screen and Color RAM offsets (the lower 16 bits) are calculated using the following.
SCRNPTR(lohi) = XPos / 8
COLPTR(lohi) = XPos / 8
In the sample program we are updating TEXTXPOS and the screen and color pointers every frame, this is only taking about 1/8 raster lines and is very fast to do.
Vertical scrolling
Scrolling vertically is very similar to horizontal except that we shift the screen up by subtracting YPos from TOP_BORDERV400 and putting this into TEXTYPOSV400, when we’ve scrolled a full character we need to add LINECOUNT to the screen and color pointers.
Tip: It is worth noting that if you are scrolling vertically you really want to choose a value that is easy to calculate, for example, a power of two (64, 128 etc) are just a number of shifts, or a combination of some shifts and some adds (160 = (Yc << 7) + (Yc << 5)). In the sample we create a table of row offsets which is fine if you are only scrolling by a screen or so but if your vertical height is large this would be a waste of memory and you will want to multiply to find the y component when calculating the screen and color RAM pointers.
We calculate the amount that we shift up from YPos, remember that if you are in V200 mode you will need to multiply by 2.
VShiftOffsetV400 = (YPos & 7) * (V200 ? 2 : 1)
Now we can get the new TEXTYPOS by subtracting the VShiftOffset from TOP_BORDER.
TEXTYPOSV400 = TOP_BORDERV400 – VShiftOffsetV400
Screen and Color RAM offsets (the lower 16 bits) are calculated using the following.
SCRNPTR(lohi) = (XPos / 8) + ((YPos / 8) * LINESTEP)
COLPTR(lohi) = (XPos / 8) + ((YPos / 8) * LINESTEP)
You can see here we are adding both the horizontal and vertical character offsets to screen and color pointers in one equation.
As we scroll the screen vertically in this manner you will see a space showing up at the bottom of the screen, similar to how we solved the horizontal issue we need to add one to DISPROWS to get the VIC-IV to show one more row.
Vertical limitations
Because we are calculating a new TEXTYPOS when scrolling vertically, we have to be sure that the new position is always >=0, because of this we need to limit the number of vertical lines you can scroll. I’ve added error validation into the sample to catch if you are trying to set the screen too tall.

Conclusion
You will need to extend this technique to suit the specifics of your own game, especially around buffer sizes and LINESTEP values.
The next tutorial will be a short one and I’ll cover how to automatically handle NTSC vs PAL as until now we have been hardcoding our program to only handle one or the other.
Please free to leave comments and point out any mistakes, I want to keep these blog entries as a kind of living document that is always up to date and correct so future coders can use this as a reference site.
Very helpful. Thanks. I’m waiting for new articles.